
Camera Filters - A Helpful Guide

Each type of filter performs a specific job by manipulating the light that can enter the camera lens. For example, they can reduce the overall amount of light, reduce light in specific areas of your image, change or enhance colours, reduce glare, protect your lens and more!
Camera lens filters can be extremely useful pieces of kit to have. Through this page, I’ll run through the main types of camera filter you will encounter and how they can be used, focusing on those used primarily for landscape photography with digital photography.
Screw Vs Slot Filters
This simply means the way in which the filter is attached to your lens to fulfil its purpose.
Screw in filters have a screw thread on themselves, and screw in to the threads on the edge of your lens barrel. Each lens has a specific diameter (often manufacturer’s will try to keep to as few different diameter’s as possible), so each filter has to match that size. Screw filters are extremely easy to put on and off, but it can get trickier if you want to layer multiple filters together. Some will allow you screw in a 2nd filter to the back of the first, but you need to be careful with vignetting (seeing the filter in the edges of your image).
Slot-in filters are normally square or rectangular, and work with a filter holder. The filter holder is screwed in to the thread on the camera lens barrel, then the filters go into slots on the holder. There are normally multiple slots on a holder so you can use multiple filters together and swap around as needed very easily once the holder is attached. In a similar fashion to screw filters, each lens diameter will need a different size filter holder.
Types Of Camera Filters
UV Filters
UV filters are most often used to protect the front element of your lens against any damage, dirt or moisture. Many photographers will permanently have a UV filter attached to the front of their lens to prevent any damage. They can be extremely useful in specific environments and weather conditions, such as near the sea, dusty or dirty areas (especially when windy!) and so on.
They do fulfil a second role of blocking UV (ultra-violet) light, so can also be used to reduce the haziness that you see when taking photos in bright daylight. Unlike most other filters, UV filters do not affect the majority of light entering your camera so do not change the exposure.
It can be worth splashing out a little bit more for a good, glass UV filter for strong protection. Cheap, lower quality UV filters can reduce the overall sharpness of your photos, so if you use a UV filter a lot it’s worth the investment for sure!
ND Filters
ND filters (or neutral-density filters) are darkened glass/resin and reduce the amount of light that enters the camera across the whole colour spectrum. They are extremely useful in conditions with difficult lighting to prevent parts of the image being under- or overexposed. Provided you adjust settings to the same overall exposure, there should be no change to the colours/tint of your images when using a good quality ND filter. A cheap ND filter can block certain parts of the colour spectrum more than others, giving a change in colour. The first (cheap) ND filters I used gave everything a slight purple tint – not ideal!
ND filters come in different ‘stops’ (see this article on exposure). For example, a 4-stop ND filter will reduce the light entering the camera by 4-stops, so you will need to adjust your camera settings (aperture, shutter speed, ISO) to achieve the same exposure. ND filters can range normally from 1-stop up to around 10 stops.
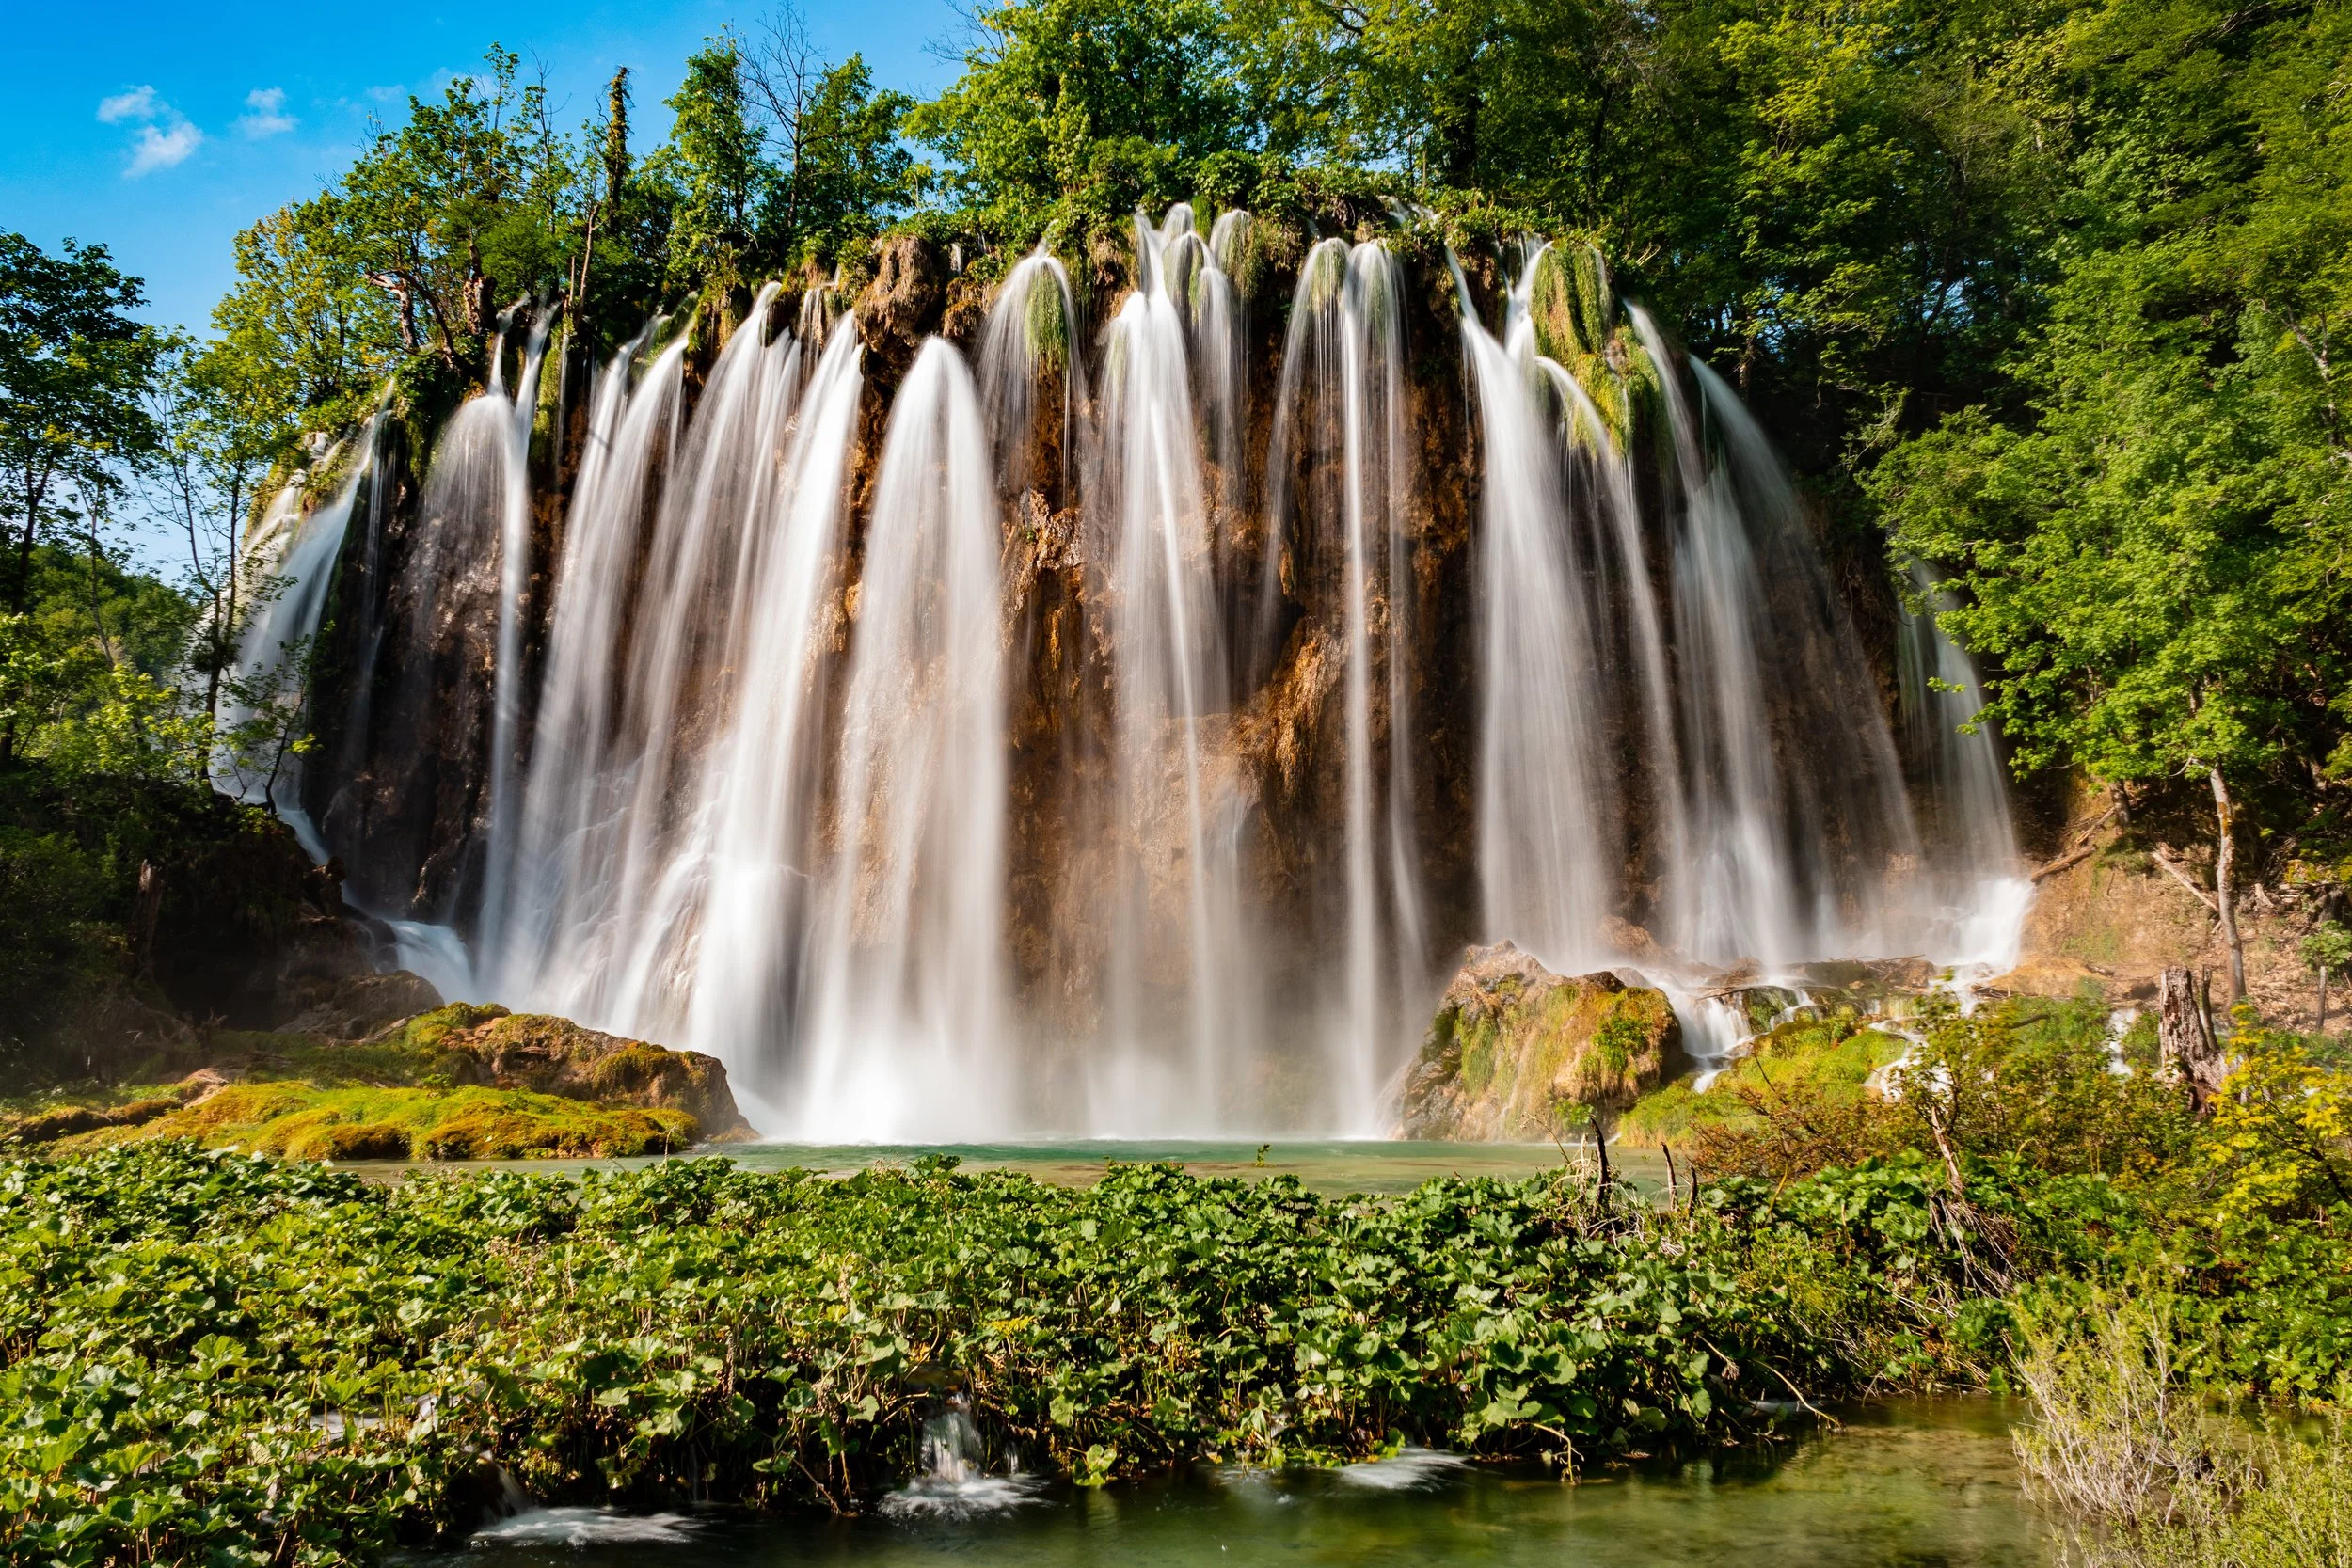
ND filters are great in situations where you want to increase the shutter speed without changing other settings, for example when shooting seascapes or waterfalls (make sure to bring a tripod!).
In the image above, despite being in bright midday Sun I was able to use an ND filter to extend my shutter speed and get the silky effect to the waterfall.
Graduated ND Filters
Graduated ND filters work in exactly the same way as ND filters, but have a transition between light and dark. Graduated ND filters are also measured in stops, and can also have variable transitions. Some have a ‘hard’ transition so very suddenly go from light to dark. Others have a ‘soft’ transition. Graduated ND filters are perfect for conditions where you have a bright sky, with darker foreground/midground, as they allow you to correctly exposure the whole image with less contrast between bright and dark areas.
Polarising Filters
These work similarly to polarising sunglasses, and block the polarised part of light. This helps to darken skies, increase contrast, reduce haze, and reduce or remove reflected light.
Most polarising filters these days a circular. Once attached to the lens, you can rotate the polarising filter to adjust the effects. At full effect, this should remove reflections from water, which can help add detail to your images.
Be warned though, they can cause parts of your image, especially parts of the sky, to appear darker/tinted so it takes some practice to get the desired effect without negative consequences.
Other Filters
These are less commonly used but by no means unimportant.
Colour correcting filters – these are helpful for adjusting the temperature of an image in real time (rather than post-processing), particularly in black and white photography.
Special effects – filters are available to achieve effects like starbursts, or completely change your image with diffusion filters, infrared filters and more.
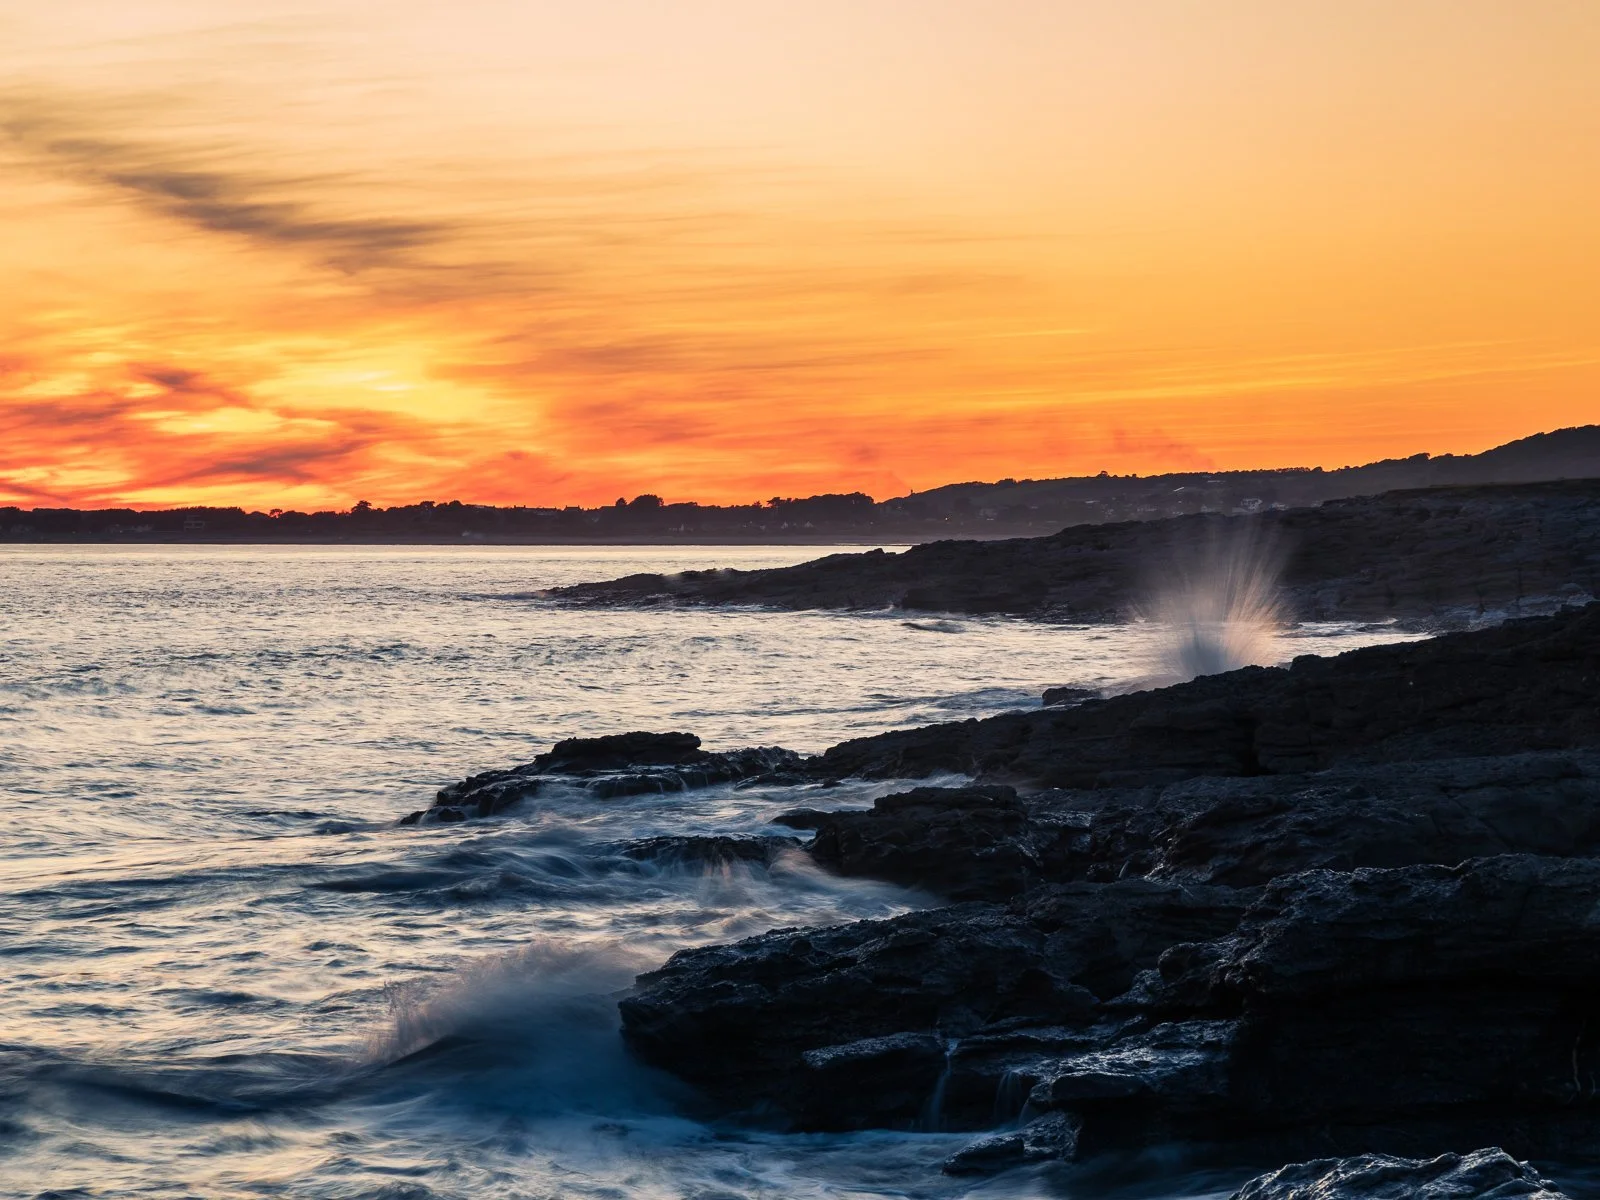
Here I was able to use a graduated filter with the transition on the horizon to reduce the brightness of the sky and pull out the vivid oranges and yellows you can see.
Choosing A Filter
This is down to a range of factors including:
Desired effect – what do you actually want to achieve? Lens protection – go for a UV filter. Long exposure photography – go for an ND filter (ideally with higher stops).
Size – make sure you have the correct sized filter/filter holder for your lens – depending on your lenses this could mean have quite a few! If you do have multiple lenses it may be easier (and cheaper) to get a slot-in system, where you can get different sized holders quite cheaply, and save your budget for the filters themselves. Each lens will say the filter ring size in the specification.
Budget – you can spend an awful lot of money on filters, so budget will be a big factor in deciding which filters to get. In general, I would say to avoid the very cheap filters as they will far more often than not cause some form of distortion/colour cast or other negative effects on your photos. Mid-range is usually the best starting point – top-end filters are usually in the realm of professional photographers with very high spec cameras.
Conclusion
Filters can be an incredibly powerful addition to your photography arsenal. Many of the effects of filters can be achieved in post processing or other methods, but I find it satisfying to see a more accurate representation of the final image in the camera itself. This also prevents you not realising mistakes until you open up your images in your preferred editor.
It certainly takes some practice to get the most out of your filters, and avoid any mistakes in your final images, but they can really add a new element to your photography and help you get the best image from many situations.